I first registered my Gmail (or Google Mail as it was known back then) account on the 25th of July 2009. Twelve years and 23,000 emails later, I’ve decided that it’s time for me to move on to a new way of handling my email.
I’ve been considering doing this for quite some time now. Email is such a critical component of life these days. Keepass (my password manager of choice) informs me that I have over 300 accounts registered using my Gmail address. Imagine if I lost access to that address for some reason. It would be disastrous! For me, taking full control of my main email address seems like basic risk management. There’s a number of other benefits as well, such as an improved professional look if you use your email for work and the near certain knowledge that no one is harvesting your emails for analysis.
Selecting a Domain (and Address)
The first decision I had to make was what would be my new email address. Recently, I’ve seen a lot of people using domains with TLDs such as .online, .tech, etc. Many of these newer TLDs have good prices for the first year (as little as $0.99), but staggering renewal costs by comparison. Additionally, the owners have absolute discretion over renewal prices (there are no limits imposed), which could leave you at risk of extortion: pay up, or lose your domain (and email address).
For that reason, if you’re considering doing this: I’d strongly recommend a domain on a TLD where future drastic pricing changes are unlikely. I have owned a self-titled .com domain (jackharley.com) for many years now, so that seemed like a good choice. Pricing for .com domains is somewhat well controlled, so extortion isn’t too likely any time soon.
Email-as-a-Service vs. Self-Hosting vs. Hybrid
Next, I needed to decide whether to use a third party service such as ProtonMail or FastMail to host my email or alternatively to rent a server and host it myself. I want to be clear and say right now that these email-as-a-service providers are the best choice for 99.9% of people looking to move off Gmail/etc. I don’t want to encourage anyone into following my self-host journey who doesn’t fully understand the difficulties ahead of them.
The cost for a server capable of running both the email server and necessary other services (e.g. anti-spam/anti-virus software) will likely be more expensive than ProtonMail/FastMail; and that doesn’t include the value of your time. You also miss out on some advantages of these services that you can never replicate with a fully self-hosted setup. For example, your mail server will never be as reputable as a Gmail server, so you’ll never have that 100% guarantee that your emails don’t end up in a junk folder. If that’s something that could keep you up at night: abandon ship now.
I’ve also seen suggestions in the wild for what I’ll refer to as a “hybrid” approach. In the hybrid approach you host your own mail server/storage, but outsource parts of the stack to another provider. For example, you can outsource your outbound mail delivery to something like Amazon SES. The main benefit here is that you don’t need to worry about being spam filtered by your email recipients since Amazon’s servers have a good “reputation” in spam filters. You also don’t have to worry too much about things like DKIM, DMARC, SPF, PTR, etc. beyond following the instructions Amazon gives you to add records to your DNS.
Going further, you can use something like MXGuardDog to handle your incoming mail. MXGuardDog receives your mail, filters spam, and forwards the clean stuff on to your server.
I’m not a fan of these approaches. If you’re trying to regain control of your email then having all of it flow through external services kind of defeats the entire purpose. In my opinion, you should either go with a full all-in-one service provider such as ProtonMail or do it all yourself.
Choosing a Mail Server Stack
So at this point I’d settled on using my domain jackharley.com for my address, and I had decided I was going to self-host the entire stack. For the actual server I saw a nice offer on LowEndBox for a 2-core 8GB Epyc-based VPS from AlphaVPS so I picked one of those up.
Next up is the actual mail server stack, these were the main options I found during a somewhat exhaustive search:
- Mailcow: Comes with SOGo included which is “groupware” and generally seems more aimed at people looking to run a server for multiple users. Also requires an SQL server and has a recommended minimum RAM requirement of 6GB.
- Docker-Mailserver: Lightweight, easily customisable with main configuration in a single file, no database required. First-class Docker support (you have no choice).
- Mail-in-a-box: Lightweight, but seems to lack some important features (in my opinion) like ClamAV and includes services I’m not a fan of (Roundcube webmail, Nextcloud, etc.)
- DIY: This would involve setting up each service from scratch. Since I’ve never ran a proper mail server before I ruled this out straight away. Perhaps I’ll attempt this someday.
For me, Docker-Mailserver seemed like the best choice. I run most things in containers these days anyway so this would fit nicely with my systems administration philosophy. Additionally, of the options above it seemed to assume the most technical knowledge and give the most control to the user setting it up. That might not be great for many people but it’s exactly what I was looking for.
Basic Setup
Let’s start setting things up, feel free to follow along if you need a bit of a high level walkthrough.
I created a mail folder in my home directory and grabbed setup.sh, mailserver.env and docker-compose.yml from the docker-mailserver GitHub and edited mailserver.env with my settings. I followed the setup instructions to create an initial email account and launch the container and in no short order I had a running mail server.
In terms of domain/DNS setup, you need the following records for your initial minimum setup:
- An A record pointing to your mail server IP address
- An MX record pointing to your mail server hostname
At this point you can send a mail from your old email to your new email, and hopefully you’ll be able to see it appear in your email client of choice. I’m currently using Thunderbird on Linux, and FairEmail on Android.
SSL/TLS
I already had a wildcard certificate for jackharley.com issued by LetsEncrypt, so I just mounted my /etc/letsencrypt/live/jackharley.com folder into the container with a bind mount in the docker-compose.yml and updated mailserver.env to use the certificate/private key.
I don’t really want to get too much into how to setup LetsEncrypt here, they have an official getting started guide available here.
Getting to the Inbox: PTR/SPF/DKIM/DMARC
If you don’t want your mail to be marked as spam and never be seen by your intended recipients then you need to pay attention here.
First of all, do not send any emails until you know everything is configured perfectly. If you send a spam-like email to a Gmail address I strongly suspect your reputation will take an instant permanent hit and later improvements to your setup are unlikely to fix your initial misstep.
Step 1 is to setup a reverse DNS record (PTR) on your IP address. You need to get your VPS/server host to set this for you. Some hosts will have a place to update it yourself, others may require you to open a support ticket.
Step 2 is SPF, you simply need to add a TXT record to your DNS with the following content:
v=spf1 a mx -allThis tells other mail servers that only IP addresses pointed to by an A/MX record are allowed to send mail for your domain. The -all directive means that all mail not satisfying these requirements should be dropped entirely.
Step 3 is DKIM. DKIM allows you to publish a public key into your DNS records, and use the associated private key to sign all of your emails. This way, other mail servers can be confident that a mail from you is really intended, and not spammers abusing an open relay/etc. Docker-mailserver has instructions for setting this up here. Here’s my DKIM record for reference:
v=DKIM1; h=sha256; k=rsa; p=MIICIjANBgkqhkiG9w0BAQEFAAOCAg8AMIICCgKCAgEAySMBjQOl4PinfH7pHS0TIMcVb73Fj++H0yQIvzOZH2opyMkC3y4+hp/Q6qDAjNTZcvptkk7gm+YuABRNwi7coYa0BJv4WlXHbmvYNQXJwqOAOGc/LqlqdgEmVWLWDBCWojHb5rjnKZj91km3SylQh/IPhu6SGJhU65uvXakkgMhWTAJARe4ArLQjKD+WFXpv3LxcpRzwYgSYP+OBdKhzBdQkG8No8pQfPedSjRjA8aryrEc8YGnRdbZHtZXKWCZYCyFUHJbeg9ySZcqX6rIrveunkA6j5/d2gOru7pod2msHxprUymZ8alr6GLHqKqIMefQQ9BVRYn/HmtI113L6BB7FdUsDYKwdnLl8kye5hwY1oJfQPtmtYNYwZqonP76CNKhCzQsPI8Eb1Hym+pHWcDUJSauaw89u3gekqgXrAtAZPAw8SiW5IQSB3S6n30SO7egeh4sUF6u9Q/6sU2DBh9ZS6uuj9CmJDhXBMRmoPAEbS1+mW4cWubYN6QLvJrhyCOqbtRIRdH+vxuWzJotTBNAg20NJT1Ub94vOwa9rWoJnibfv1Ol0WmSq6C4OXCbAxgUU3Okxo/T96faSzqAbQwDlMP/DVnM+Q8Gc3cGMjRHvxiZfOw7UFoz1cyaNej83/1mSliG3kiEhmh1cZ5y8z6V4dzwG7LTDwBqHQVEYyKMCAwEAAQ==Step 4 is DMARC. DMARC is similar to SPF, it allows you to specify policies for mail from your domain, particularly in terms of DKIM requirements, i.e. with DMARC you can tell other mail servers that they should reject any mail that hasn’t been DKIM signed. You can also specify email addresses to receive reports from other mail servers on failures (which will help if you need to debug). You can use this tool from GlobalCyberAlliance to create a DMARC record by choosing a number of options in a wizard. Here’s my current DMARC record:
v=DMARC1; p=reject; rua=mailto:postmaster@jackharley.com; ruf=mailto:postmaster@jackharley.com; sp=reject; fo=1; ri=86400Testing your Mail
So how do you know if you’ve set things up correctly?
Thankfully there’s a great service available here: https://mail-tester.com/
You can simply send an email to the address it gives you, and it will generate a report telling you about any issues you can improve on.
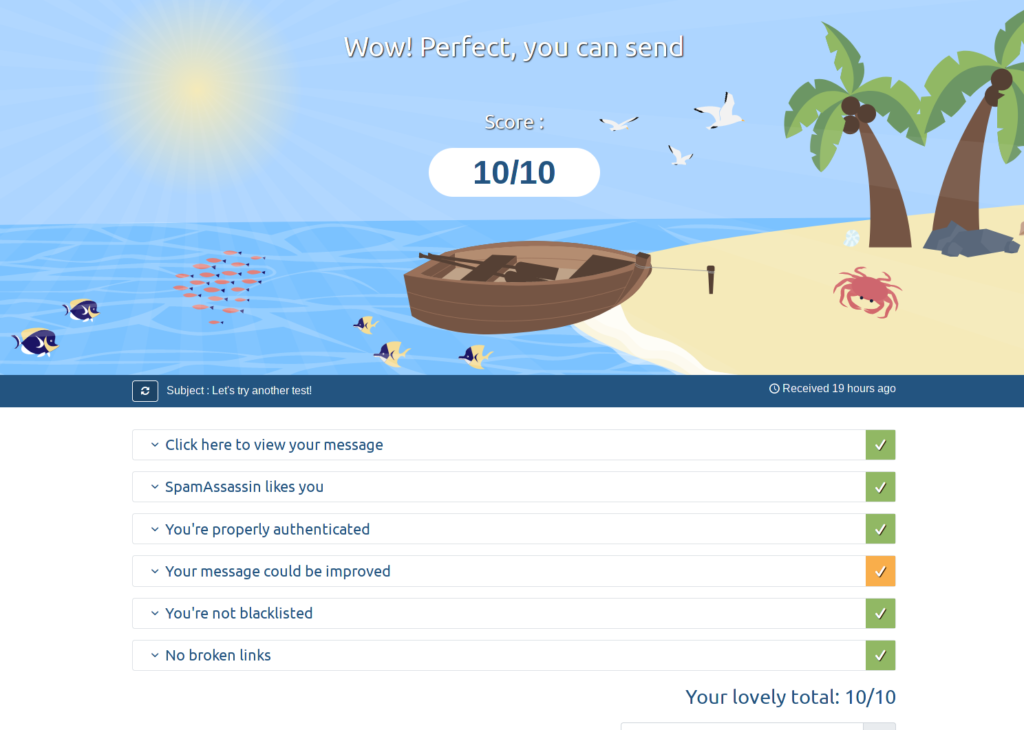
N.B. You only get 3 free tests per day so avoid hammering it after every change you make! Wait until any DNS changes you’ve made have had some time to propagate and then give it a go.
Once you have a 10/10 score you can start sending real emails. Over time your IP address and domain name will start to gain a trustworthy reputation with other providers, which will further guarantee your mails don’t end up in junk folders.
Backups
I’m not going to say too much here because I really shouldn’t have to but you absolutely must back up your email server. I like using restic personally. Make sure you follow the 3-2-1 rule (3 copies, on 2 different forms of media, with 1 of them in a different location).
Wrapping up
This whole process took me about 6 hours of work which wasn’t too bad really. I’m very happy with the result and I built a Grafana dashboard to keep an eye on my logs from the various services in the mailserver stack. It’ll be interesting to see how the server copes once I start receiving spam, but for now everything’s running very smoothly! I’ll probably write an update in a few months with my evolving thoughts. Let me know in the comments if you’re running your own self-hosted setup, and any thoughts you have on the process/etc.